
How to Install Java and Set Up IntelliJ IDEA for Beginners?


Java is easier to learn when you can actually write and run the code as you learn it. But before that happens, there is a bit of setup to get through: installing the JDK, choosing the right IntelliJ IDEA version, creating a project and getting your first Java file ready.
The good part is that you only need to set this up once. Here’s everything covered in the video, from installing Java and IntelliJ IDEA to creating a simple Java program and running it for the first time.
What Do You Need Before You Start?
Before you begin, make sure you have the following ready to install Java and set up your coding environment:
-
A laptop or computer for coding. The source recommends watching the lecture on a phone or tablet if you want, but doing the actual coding on a laptop or computer.
-
A Java Development Kit (JDK). This is required before setting up IntelliJ IDEA for the Java project.
-
IntelliJ IDEA Community Edition, as used in the source video.
-
A 64-bit setup for the Windows installation described in the source. If you are on a 32-bit system and cannot use the same setup, the source suggests alternatives such as VS Code or an online Java compiler.
Step 1: Install the Java Development Kit (JDK)
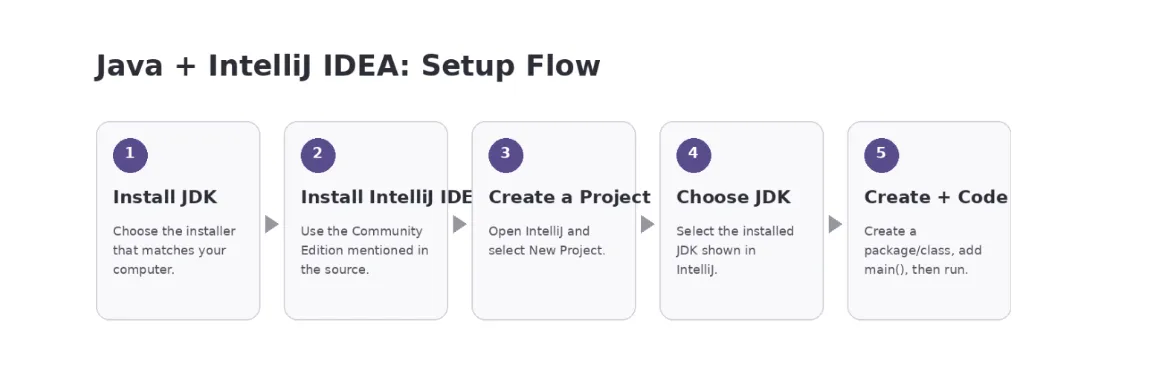
The first setup step is installing the JDK. IntelliJ IDEA needs a JDK so that you can create and run Java programs.
For Windows
-
Choose the Windows x64 installer shown in the source.
-
Download the installer and open the package once the download is complete.
-
Follow the installation steps on your computer.
The source notes that the JDK download is a fairly large file, so the download time can vary depending on your internet connection.
For Mac
-
If your Mac uses Apple Silicon, such as an M1 or M2 chip, choose the ARM64 option.
-
If your Mac uses an Intel processor, choose the x64 DMG installer.
-
Open the downloaded package and complete the installation.
New to programming? Build your basics in logic, syntax and problem-solving with Computer Science & Programming Fundamentals.
Step 2: Install IntelliJ IDEA
Once the JDK is installed, the next step is setting up IntelliJ IDEA, the coding environment used in the video.
-
Download IntelliJ IDEA.
-
When the edition options appear, select Community Edition, as shown in the source.
-
Choose the build that matches your computer. On a Mac, this means checking whether your machine uses Apple Silicon or Intel.
-
Install IntelliJ IDEA and open it once the installation is complete.
The source describes IntelliJ as a heavier download than the JDK, but also explains that it is straightforward to use once installed.
Step 3: Create Your First Java Project
Open IntelliJ IDEA and choose the option to create a new project. Give your project a name, such as the examples used in the source, and select the JDK available in IntelliJ.
The source shows JDK 18 appearing in the IntelliJ project screen after installation. The important point for this setup is that IntelliJ should recognise the JDK you installed.
-
Open IntelliJ IDEA.
-
Select New Project.
-
Enter a project name.
-
Check the JDK selected for the project.
-
Create the project.
Running your first Java programme is just the start. As you build confidence with programming, you can take these skills further and learn how different technologies come together to build complete web applications with PW’s Full Stack Development with AI
Step 4: Understand the Project and the src Folder
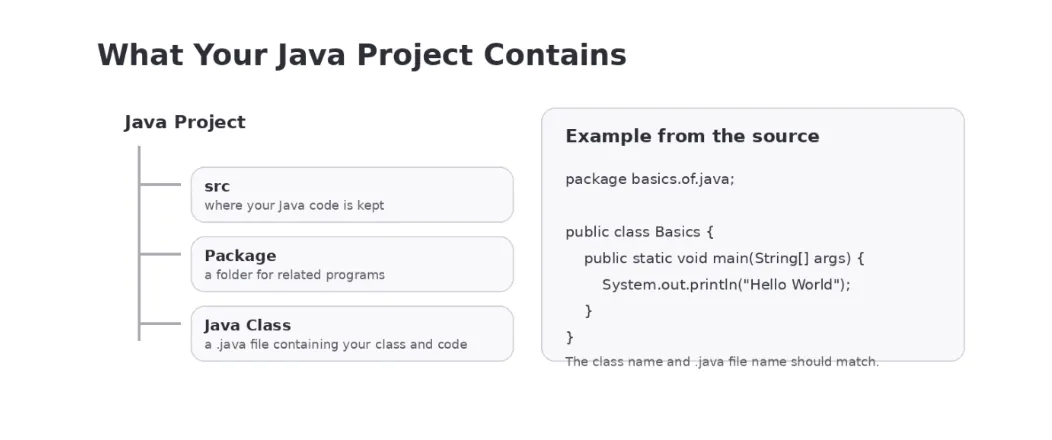
Once the project opens, IntelliJ shows the project files and folders. The source points out the src folder because this is where the Java code will be created.
You will also see Java files with the .java extension. The source explains that Java program files use .java as their file extension.
Step 5: Create a Package for Your Java Programs
Inside src, you can create packages. In simple terms, a package works like a folder for organising related Java programs.
The source recommends keeping different topics in separate packages. For example, programs related to basic Java concepts can go into one package, while later topics such as arrays, linked lists or stacks can have their own packages.
-
Open the src folder.
-
Create a new package.
-
Give the package a name, such as basics of java, as demonstrated in the source.
-
Press Enter to create it.
You can then create your Java classes inside the relevant package.
Step 6: Create a Java Class
Inside your package, create a new Java class. The source demonstrates creating a class named Basics.
-
Open the package you created.
-
Choose New Java Class.
-
Enter the class name.
-
Create the class.
One important rule highlighted in the source is that the class name should match the Java file name. For example, a class named Basics is saved as Basics.java.
Step 7: Add the main() Method
The source then introduces the basic Java class and main method that you need to start running a program.
public class Basics {
public static void main(String[] args) {
}
}
IntelliJ IDEA also provides autocomplete while you type. The source demonstrates how IntelliJ can complete parts of the Java syntax for you, which can make the first few programs easier to write.
Step 8: Write Your First Java Output
To check that your setup is working, the source uses a simple output statement.
public class Basics {
public static void main(String[] args) {
System.out.println("Hello World");
}
}
Running your first programme is just the beginning. Once you are comfortable with basic Java syntax and output, you can start practising more Java concepts and coding problems with Decode Java with DSA
Step 9: Run the Program
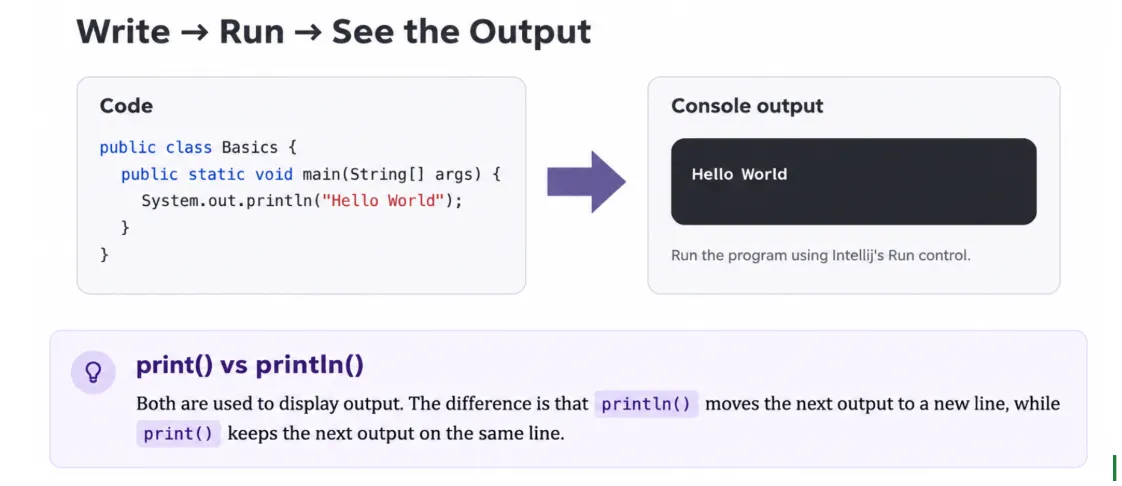
Once your code is written, click the Run button in IntelliJ IDEA. The output will appear in the console.
What If IntelliJ IDEA Does Not Install?
If you cannot install IntelliJ IDEA on your computer, the source suggests using an online Java compiler as an alternative. It also mentions VS Code as another option for coding in Java.
For the smoothest experience with the setup demonstrated in the video, however, the main walkthrough uses the JDK plus IntelliJ IDEA.
Java + IntelliJ IDEA Setup Checklist
Before you start writing Java programs, make sure you’ve completed each of these setup steps:
-
JDK installed
-
Correct installer selected for your operating system and processor
-
IntelliJ IDEA Community Edition installed
-
New Java project created
-
JDK recognised by IntelliJ
-
src folder located
-
Package created
-
Java class created
-
Class name and .java file name matched
-
main() method added
-
First program run successfully
You’re Ready to Start Coding in Java
Once the JDK and IntelliJ IDEA are set up, the biggest hurdle is out of the way. You now have a Java project, a place to organise your programs and a working environment where you can write and run code.
The next step is to keep practising with small programs. Start with simple outputs and gradually move into the programming concepts covered in your Java course.