







PW Class 6 Maths Notes Chapter 8: Playing With Construction
 Neha Tanna5 Sept, 2026
Geometric constructions are about drawing shapes and lines accurately using the right tools. A ruler helps you draw and measure straight lines, a compass helps you make circles and arcs, and a protractor helps you measure angles. Knowing which tool to pick makes each construction easier to complete.
PW Class 6 Playing with Constructions Notes cover the tools used in geometric constructions and the steps for using them. You can revise how to draw line segments, circles, perpendicular lines, squares, rectangles, and perpendicular bisectors.
Which Tools Are Used for Geometric Constructions?
Before starting a construction, you need to choose the right tool. Some tools are used for measuring and drawing, while others help you work with circles, lengths, or angles.
|
Construction Tool |
What Is It Used For? |
|
Ruler |
Used to measure and draw straight lines |
|
Compass |
Helps in drawing circles and arcs of specific radii |
|
Divider |
Used for comparing lengths |
|
Set Squares |
Used for drawing perpendicular and parallel lines |
|
Protractor |
Measures angles in degrees |
How Do You Draw a Line Segment?
A line segment is a part of a line with two endpoints. You can use a ruler to measure the required distance and draw it accurately.
To draw a line segment AB:
-
Place the ruler on the paper.
-
Mark two points, A and B, at the required distance.
-
Use the ruler to draw a straight line joining A and B.
Points A and B are the two endpoints of the line segment.
How Do You Construct a Circle?
A compass is used to construct a circle. Before drawing one, remember these three terms:
-
Radius: Distance from the centre to any point on the circle.
-
Diameter: Twice the radius.
-
Centre: The fixed point inside the circle.
Steps to Construct a Circle
-
Place the compass point at the centre.
-
Adjust the compass to the required radius.
-
Rotate the compass around the centre to complete the circle.
For example, if you set the compass to 3 cm, the radius of the circle will be 3 cm.
What Are Perpendicular Lines?
Two lines are perpendicular when they meet at a right angle of 90°.
A protractor can help you mark the 90° angle needed to draw perpendicular lines.
Steps to Construct a Perpendicular Line
-
Draw a line segment AB.
-
Place the protractor on the line, with its centre at the point where you want the perpendicular line.
-
Mark 90° using the protractor.
-
Remove the protractor.
-
Use a ruler to draw a straight line through the 90° mark.
The new line is perpendicular to the first line.
How Do You Construct a Square?
A square can be constructed by starting with one side and drawing perpendicular lines at its endpoints.
Steps to Construct a Square
-
Draw a line segment of the required side length.
-
Use a compass to construct perpendiculars at both endpoints.
-
Mark the same side length on both perpendiculars.
-
Join the marked points to complete the square.
Make sure you use the same side length while marking the remaining points.
How Do You Construct a Rectangle?
To construct a rectangle, begin with one side and then draw perpendicular lines from its endpoints.
Steps to Construct a Rectangle
-
Draw one side of the rectangle.
-
Construct perpendicular lines at both endpoints using a protractor or set square.
-
Mark the required length on the perpendicular lines.
-
Join the marked points to complete the rectangle.
The perpendicular lines help you form the corners of the rectangle correctly.
How Do You Construct a Perpendicular Bisector?
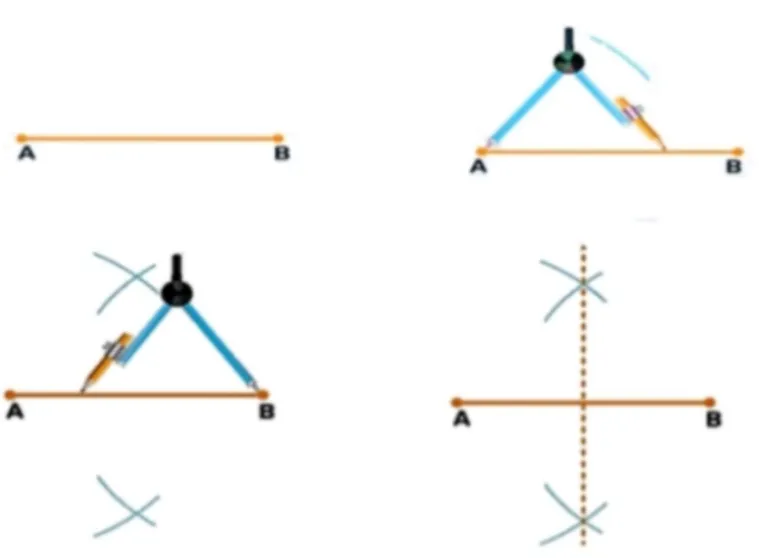
A perpendicular bisector can be formed using points that are equidistant from two fixed points. You can use a compass to draw arcs from both endpoints of a line segment and find these points. Suppose the line segment is AB.
Steps to Construct a Perpendicular Bisector
-
Draw the line segment AB.
-
Place the compass point at A and draw arcs above and below AB.
-
Without changing the method, place the compass point at B and draw arcs again.
-
Mark the two points where the arcs meet.
-
Use a ruler to join these two points.
The line formed by joining the two points bisects the line segment AB.
PW Class 6 Maths Notes Chapter 8: Playing With Construction PDF
Study without using the internet
How Can PW Class 6 Notes Help You Practise Geometric Constructions?
The PW Class 6 Playing with Constructions Notes keep each construction in simple steps. You can use them while revising the tools, measurements, and order of steps needed to draw each figure.
-
Choose the Right Tool with PW
Use the PW notes to quickly recall whether you need a ruler, compass, divider, set square, or protractor. Knowing what each tool does can help you choose the correct one before you start drawing.
-
Follow PW Steps While Practising
Instead of trying to remember an entire construction at once, revise it step by step with PW. Start with simpler constructions such as a line segment or circle before moving to squares, rectangles, and perpendicular lines.
-
Revise the 90° Angle with PW
A 90° angle is important when drawing perpendicular lines. PW notes help you revisit where the angle needs to be marked and how to draw the new line through that point.
-
Practise Compass Constructions with PW
For a perpendicular bisector, focus on the order of the compass steps. Draw arcs from A, repeat from B, find where the arcs meet, and then join those points. You can refer back to the PW notes whenever you need to recall the sequence.
Complete PW Resources for Class 6 Maths Preparation
You can use these PW Class 6 Maths resources to revise other chapters, practise questions, and prepare for exams.
|
PW Class 6 Resource |
How It Can Help You |
|
Revise concepts and topics from other Class 6 Maths chapters. |
|
|
See all the Maths chapters you will study in Class 6. |
|
|
Practise important questions from different Maths chapters. |
|
|
Solve different types of Maths questions and prepare for exams. |
Geometric constructions become easier when you know which tool to use and follow the steps in the correct order. From drawing a simple line segment to constructing a perpendicular bisector, each task uses a particular method. PW Class 6 Playing with Constructions Notes help you revise these tools and steps whenever you practise the chapter.
CBSE Class 6 Maths Notes Chapter 8 FAQs
1. Which tools are used in Class 6 Playing with Constructions?
2. How can you draw perpendicular lines correctly?
3. What should you remember when using a compass to draw a circle?
4. How can PW Class 6 Playing with Constructions Notes help with chapter revision?







 Live & recorded classes available at easeDashboard for progress trackingMillions of practice questions at your fingertips